
I wanna kill myself when seeing all the photos because my iso was high yet many photos were blurred.

So I decided to re-edit some photos and see what can I do to save them. I saw this one in particular:

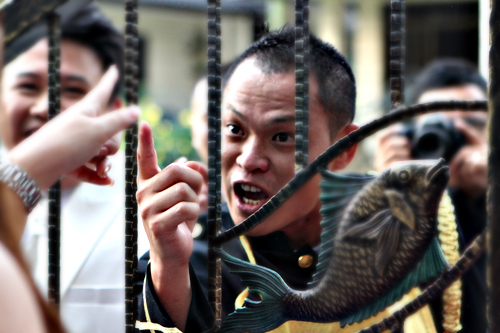
Well, I thought this was quite a nice contextual photo. Abit like loan shark shouting: "欠钱还钱,不然我就挂猪头在你家门口hor!"
but but but... the focal point is wrong!!!! Think i was too excited, and the gate made it harder to focus on the brother. So, the bro's face is actually blurred and the focus was on the freaking fish!!!!
So I tried to save the photo. And much to my delight... ta-daaa!

Yay! I deserve to be hao lian.
So, the fish was blurred out machiam like I used f1.8, but actually I used 24-70mm f2.8 lens for that. So I'm gonna tell you how to do that step by step in Photoshop so you can save your photos too!!!
STEP 1:
Unsharp Mask your photo. Follow the setting as shown:

Then, your photo will become like that:

Step 2:
Duplicate the photo, and use Gaussian Blur on your extra layer:

Set not higher than 2 pixels. So your photo will look very blur, then u start panic, wondering if I'm teaching the right thing.
Step 3:
Create Layer mask on the extra layer:

Layer mask is basically the 3rd button at the bottom in your layers window. When u press it, a white box will appear beside your layer thumbnail. Gomenasai, I no screenshot.
Step 4:
Click on the layer mask (aka white box) and fill it with black. The white box will turn black!!! And your photo will turn into the one after you did your first step:
So, make sure the black box is selected, and use a brush, white colour and go over those parts you want it to be blurred. So its the fish and gate for my case. So your photo will become like that:
Almost there!!
Step 5:
Merge your layers, duplicate layer and do gaussian blur again on the duplicated later. This is to add some layer in your depth:

You can set a higher pixel for this step. Again, do layer mask, and blur out the area such as the right hand side of the fish the back ground etc...

This one is after I merge and adjust the levels and brightness.
So last step, add vignette and some light in the background. Also crop the photo if you wanna:

We are done! Not exactly perfect but much better. Add your watermark if you wanna act pro like me.

No comments:
Post a Comment